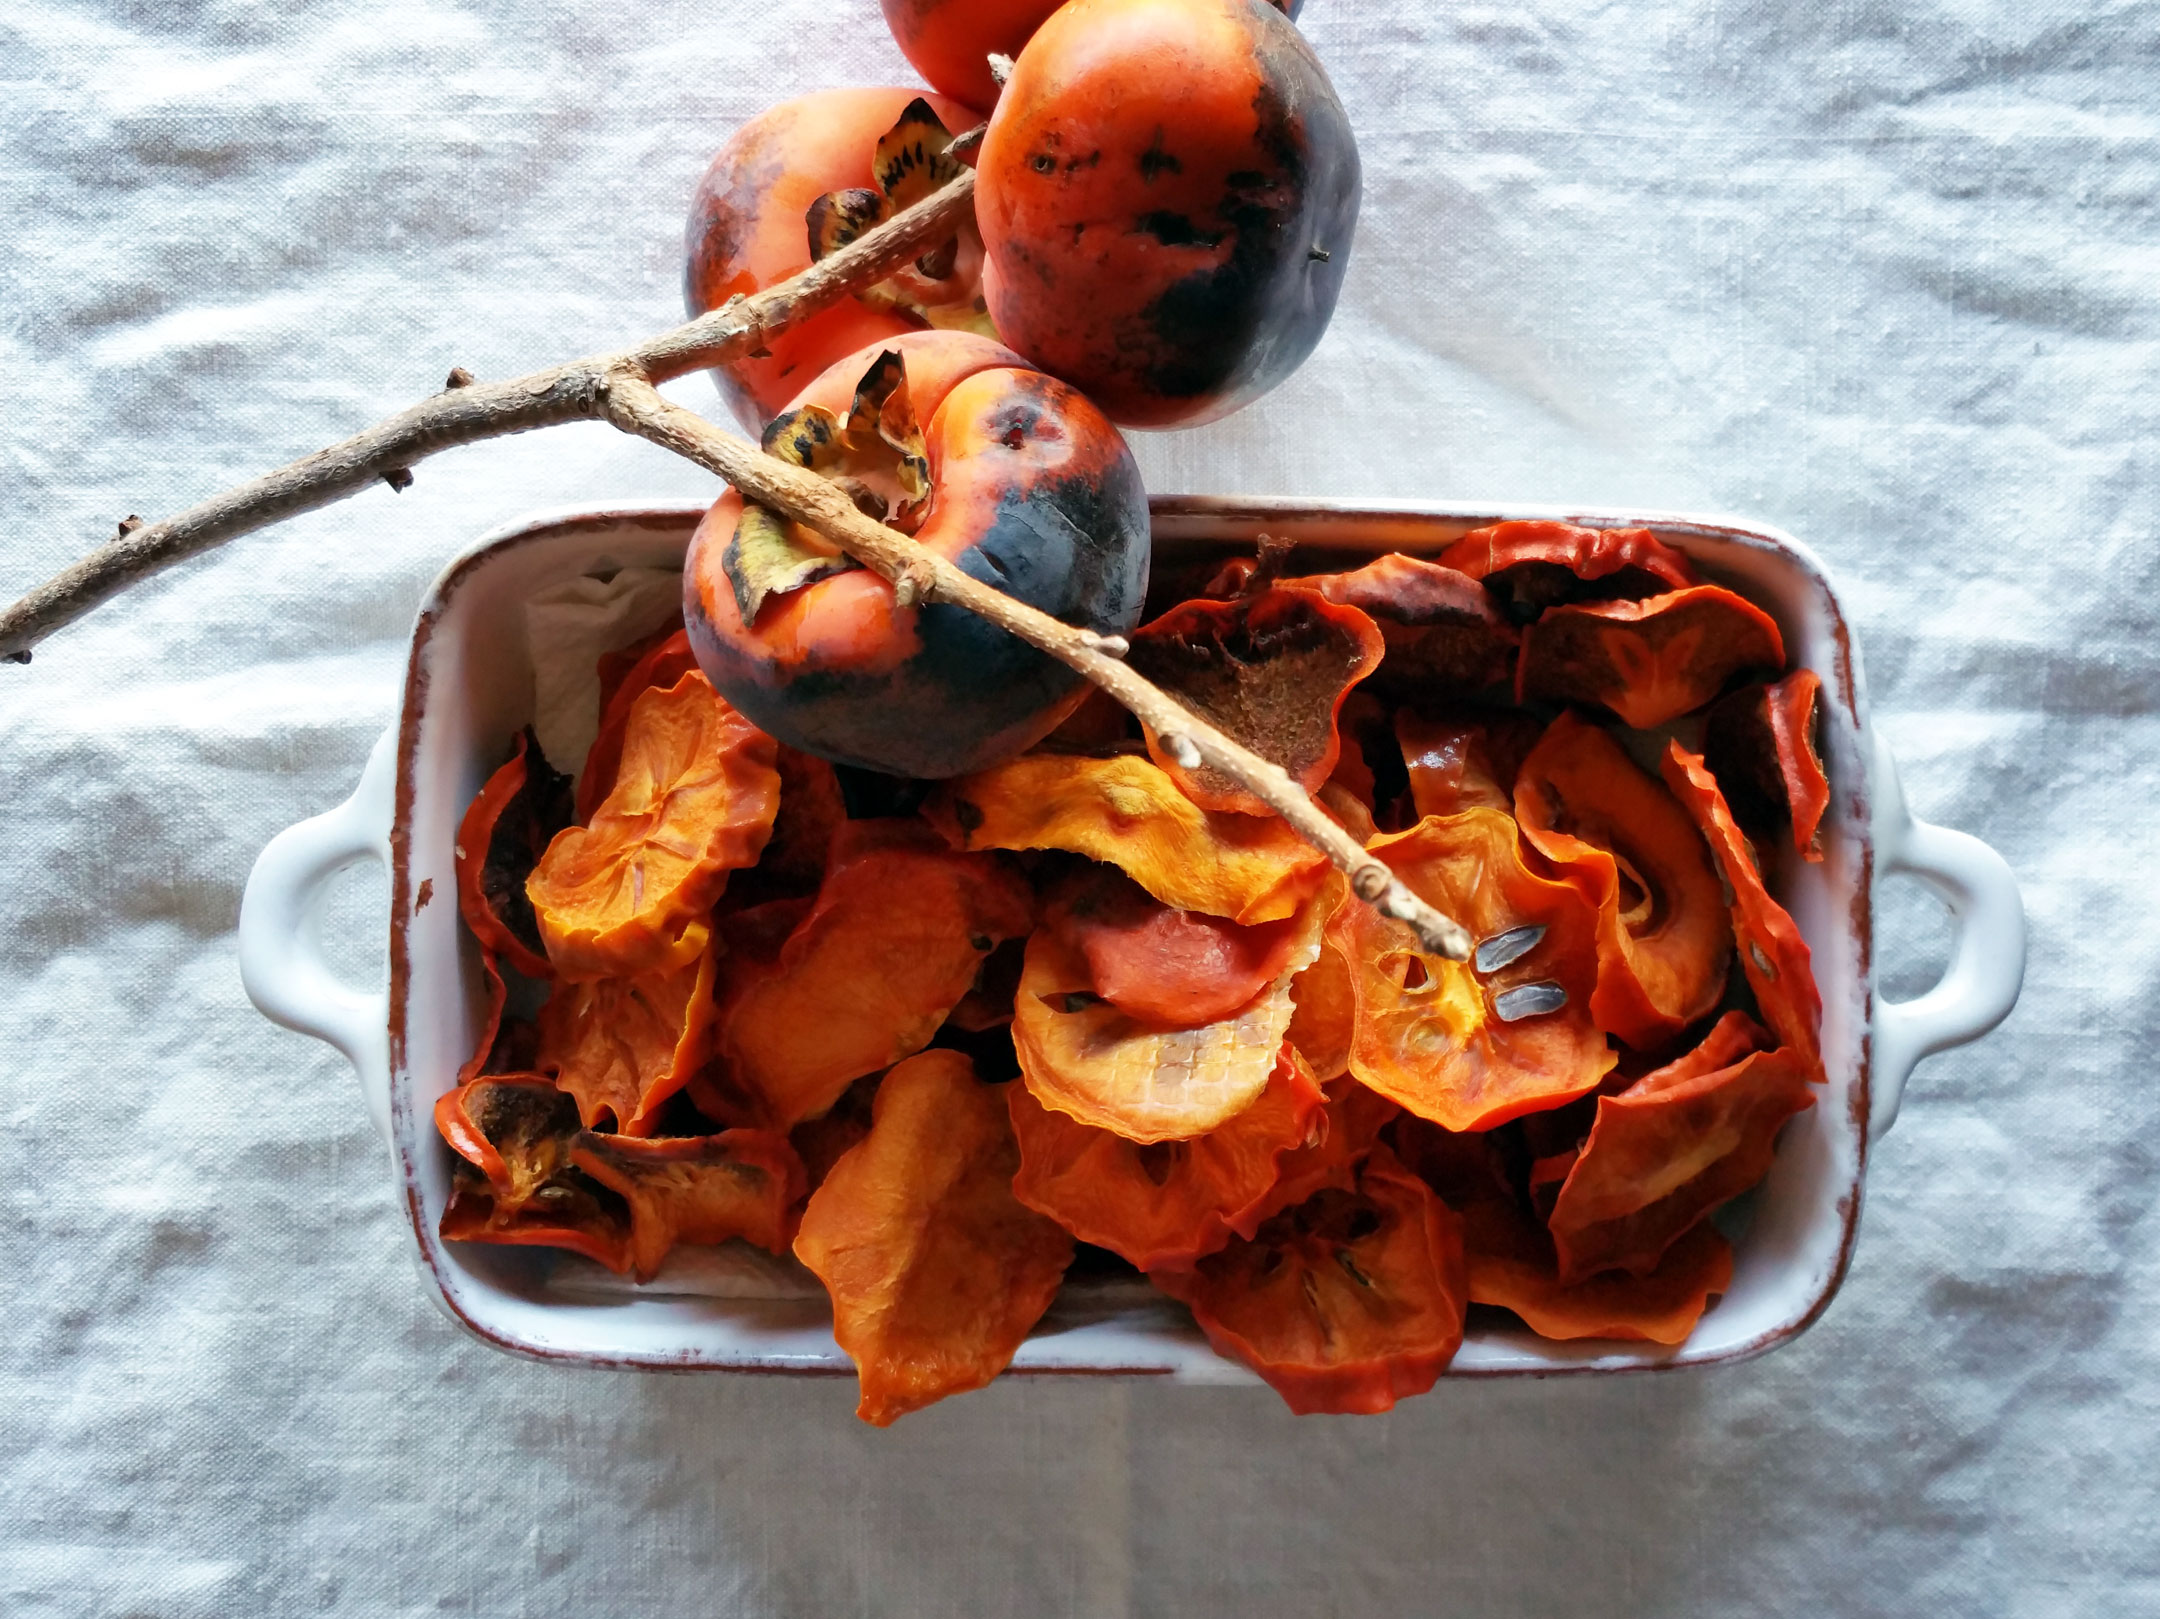
Dried Persimmons
On November 26, 2014 by sixtyacrebakerPersimmons seem to be a bit misunderstood. Some varieties need to ripen on the tree and be very soft, otherwise they are astringent, while others can remain very firm and be sweet. Personally, I prefer Fuyu persimmons. They do well in the area where we live, and grow abundantly through the fall. Firm and sweet, they are delicious off the tree, sliced in salads, frozen and enjoyed as an icy treat, and dehydrated into sticky sweet submission. To dry persimmons, you do not need a dehydrator, but it helps. If using a dehydrator, simply slice the persimmons in 1/4-1/2″ slices and set on the drying tray. Turn the heat of the machine to 130-135F for about 8 hours. Look at the fruit after about 6 hours to check on progress, they may be done. If not, check every hour until they are still a bit supple, but not wet. Leave to cool in the dehydrator for another 2 hours or so…or overnight.
If using oven: turn oven to lowest setting–preferably 130-135 if you can get it that low. Line your baking sheet with a silpat or parchment paper. Proceed as described above.
You may also choose to dry the persimmons whole. You can do that by tying baker’s twine, or other type of string to the stem of the persimmon. Tie one persimmon onto each end of the string. Prop a broomstick or other apparatus in a warm window sill. Hang the persimmon on the pole/broomstick/etc. The strings will hang over the middle with a persimmon on either side. After a day or two, give each persimmon a little massage, a gentle squeeze on all sides. Continue doing this each day until the persimmon has completely dried out and formed a bit of a sugary crust on the outside. This may take several weeks and is nearly impossible in damp conditions. If the fruit shows signs of mold, throw the fruit away.
Dried persimmon makes a wonderful sweet as candy snack. It is also great in granola, oatmeal, and trail mix. You can reconstitute with water for use in salads or tagines. Soak in wine and spices for a compote. The uses are almost endless
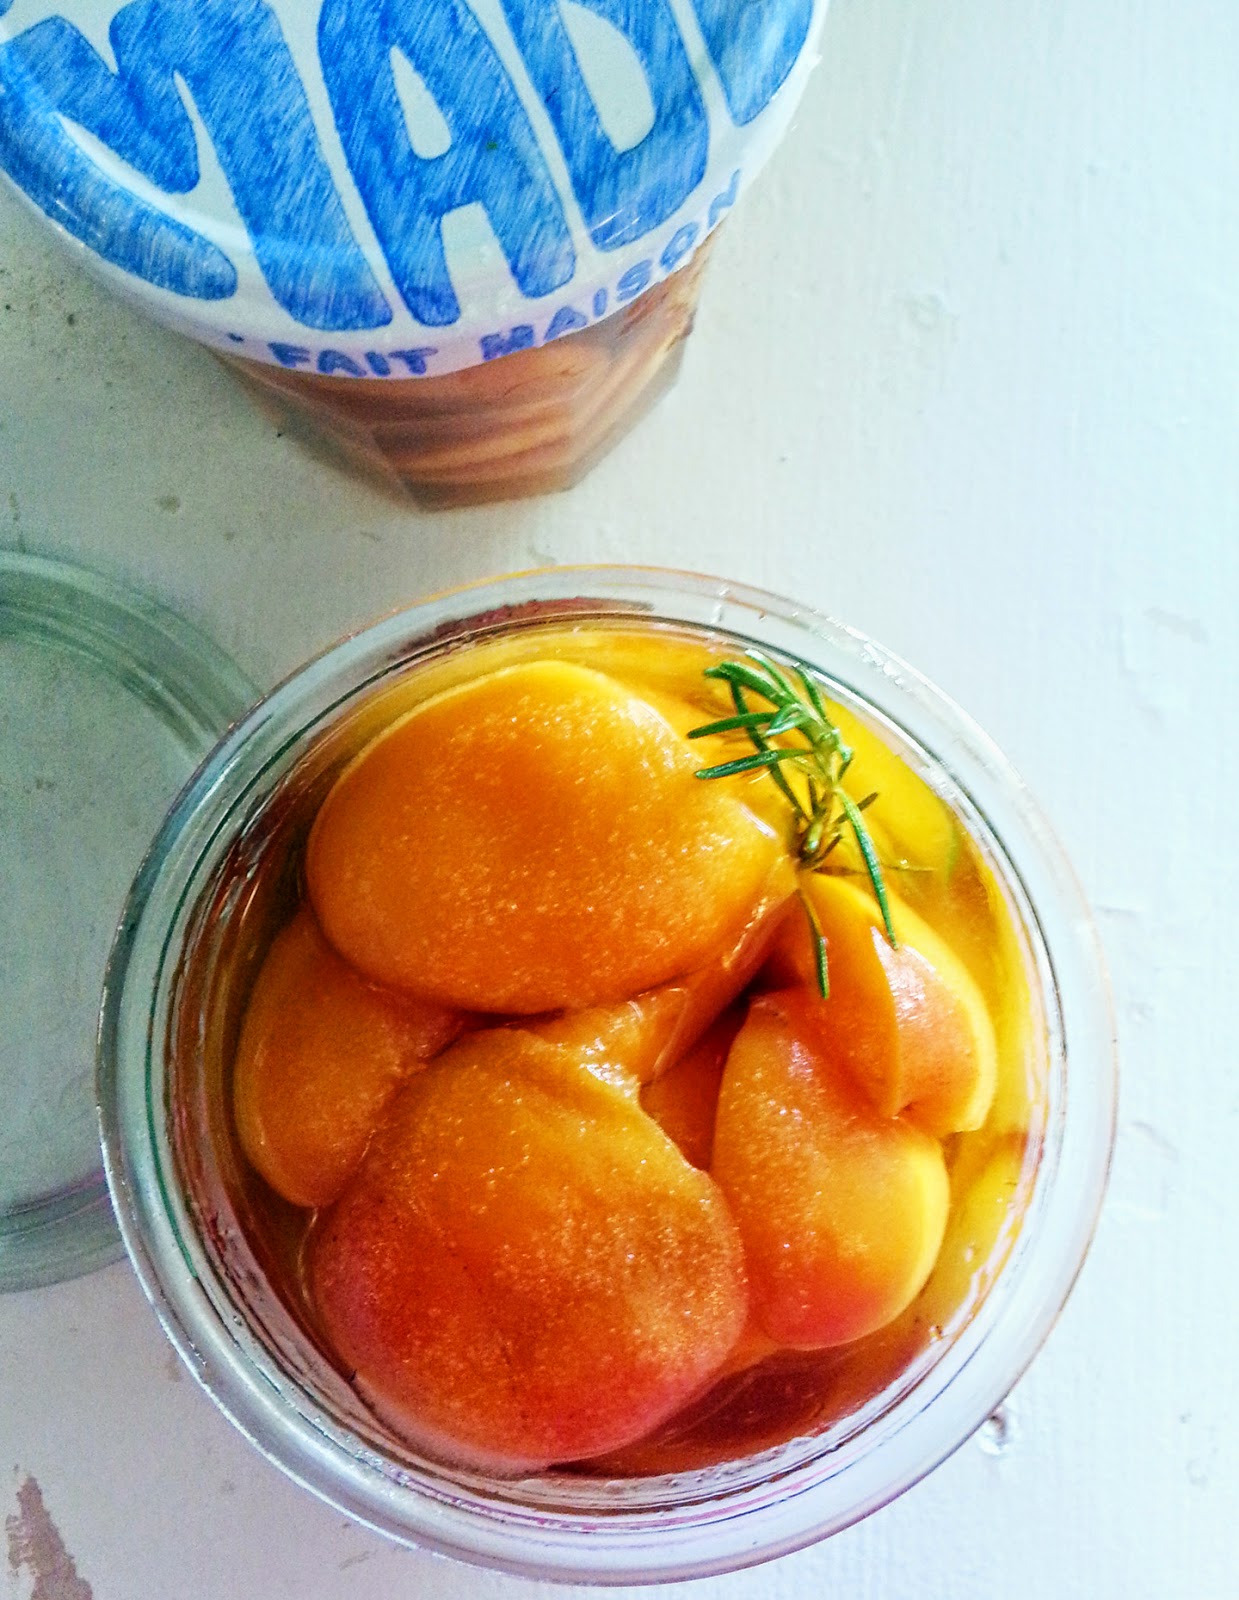
brandied apricots
On June 21, 2014 by sixtyacrebakerWe picked a bucket load of apricots the other day, and i have been working to preserve them for our winter larder. This year I have decided to brandy some. Which is a fancy way of saying,infusing with brandy. I’ve loaded my jars with freshly washed fruit (sliced in half and pitted), a sprinkle of sugar (about a tablespoon per jar),and poured on the brandy. In some i added a few extra bits, rosemary in one, cinnamon stick in another, vanilla bean in a third. There are so many lovely combinations to try. I am popping these onto a shelf, in a cool pantry. The fridge would be a great place too-if only i had room in the fridge
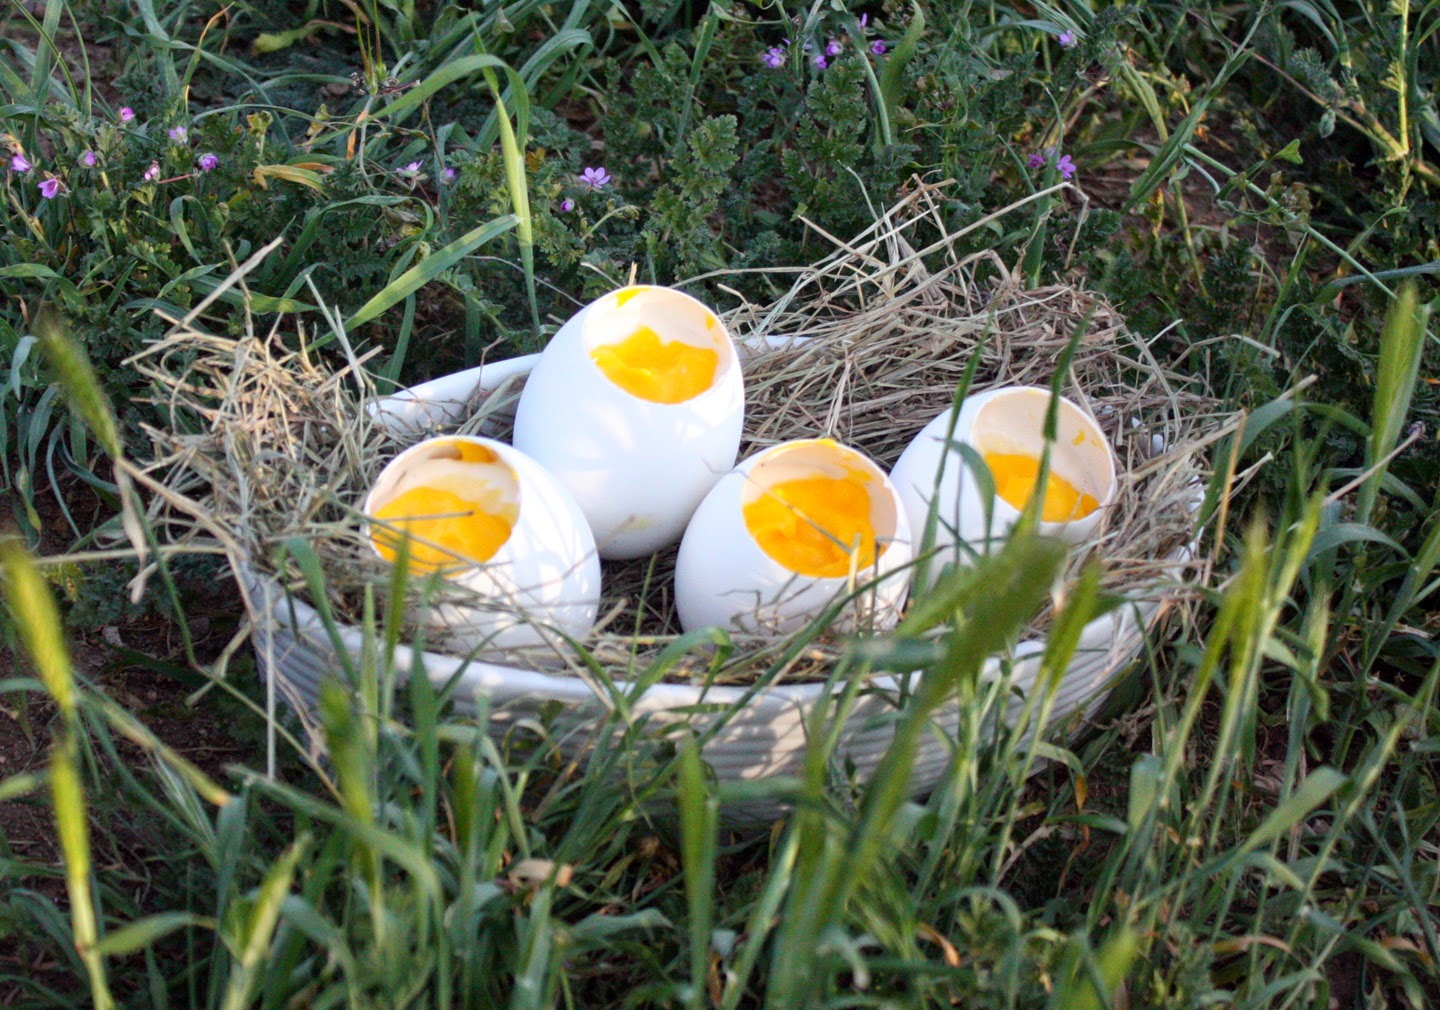
Sweet Eggs
On May 8, 2014 by sixtyacrebakerCome spring we bring it outside. Entertaining is a bit more relaxed and food becomes a bit less fussy, perhaps a tad more whimsical. Certainly, more seasonally driven. We keep chickens, ducks and geese; which means a generous supply of eggs. When putting together a weekend brunch, I love to serve sweet eggs. Very simple, and darling on display, these eggs are filled with vanilla yogurt and lemon curd.
Sweet Eggs
egg cups
emptied and cleaned goose, duck or extra large chicken eggs
-using an egg topper is by far the easiest way to get those perfect edges.
-while the eggs are uncooked, take the top off. separate the whites and the yolks as you empty the shell. use the yolks for your curd, the whites for another delicious recipe.
-you must be gentle when washing the shells, but you must be very thorough in the washing. there may be a layer of membrane attached to the interior of the shell. make sure you get that completely out. it comes out easier when you run water through it. once the membrane is cleared, use a good soap and hot water to get it completely cleaned out. let them air dry with good air-flow.
-you can either set the eggs in egg cups, or use the top inverted and glued to the bottom of the egg to create a stand. you may also just want to place in a small bowl, or in a large bowl on top of artificial grass (or if you have access, hay or straw)
plain or vanilla yogurt
vanilla extract-optional
brown or granulated sugar -optional
if you are using plain yogurt and wish to sweeten it up a bit (i recommend doing so, particularly if you have a nice tart lemon curd), add just a touch of sweetness with your sweetener of choice. i like brown sugar because it takes very little and adds a bit of a caramel flavor to the yogurt. start with 1 tsp per 2 cups and add more to taste. the same with the vanilla.
lemon curd
your favorite lemon curd recipe
-martha has a nice one HERE
-make the lemon curd as directed and let cool completely
to assemble
Place the yogurt and lemon curd in separate decorating bags (alternatively you can use a small spoon). layer directly into the shell starting with the yogurt. fill the shell approximately 1/3 full with the yogurt. add a thin (max 1/4″) layer of lemon curd. add more yogurt to almost reach the top of the shell, and top with more curd, placed to resemble an egg yolk.
serve with demi-tasse spoons.
you may also add gingersnap crumbles or graham cracker crumbles to the bottom for additional flavor and a bit of crunch. serving with a bit of granola is a nice compliment.
for something really fun, fashion sugar cookies into “toast soldiers” and pop them right in to look like a soft boiled egg and toast.
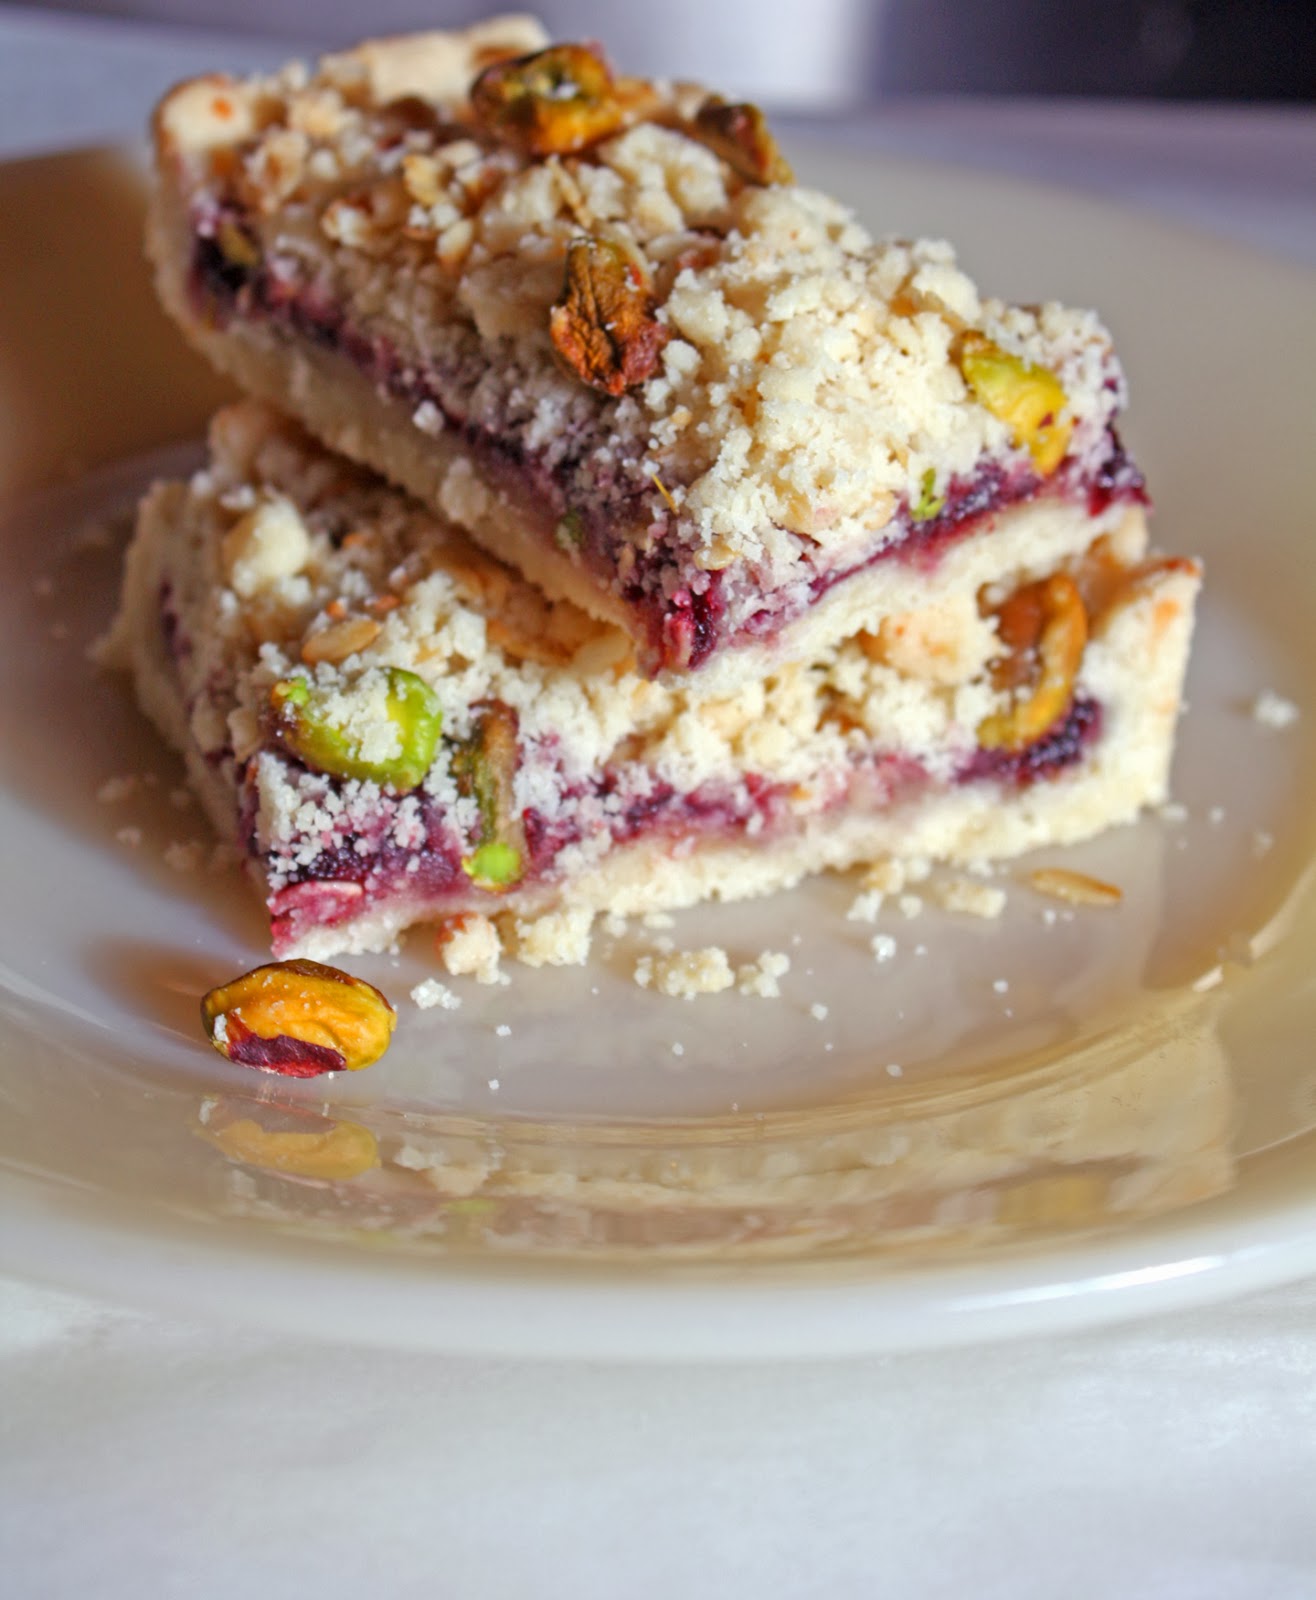
Jammy Almond Crumb Bars
On January 12, 2014 by sixtyacrebakerWe live in the country. Not the county of estates and tag sales; but the country of pastures and dairy sheep. So when someone stops by; we wave them in, take their coat and sit them down with a hot cup of coffee and a sweet.These bars are a twist on the common crumble bar. I use whatever jam i have on hand. {usually something not too sweet loaded with bits of fruit}
The twist comes in the form of almond paste. It finds its way into these cookies, at every bite.
Jammy Almond Crumb Bars
2 sticks unsalted butter–room temperature
3/4 cup granulated sugar
7 oz almond paste (divided)
2 1/2 cups all purpose flour
1/2 tsp kosher salt
3/4 cup high quality-not too sweet jam (ollalaberry, raspberry, blackberry, fruits of the forest, etc)
1/4 cup toasted pistachio nuts
Place sugar, flour and 1/3 of the almond paste in a bowl. By hand, work in the almond paste so that it is in small bits throughout the flour. Add the butter and work by hand until you get a crumble that will stick when pressed together.
Press about 2/3 of the dough into the bottom and up the sides of a 9″x9″ fluted tart pan*. Take remaining almond paste and lightly press a thin layer on top of the crust. You may not use all of the paste. spread evenly with jam.
Mix the pistachio nuts in with remaining dough. Evenly distribute remaining dough by crumbling on top of jam. (i like a thick layer of topping)
Bake at 350 for approximately 40-45 minutes. You want the crust and crumble to be slightly colored, but not over-browned.
*if you do not have a fluted tart pan, this works fine in a standard 9×9 cake pan, just be sure to bring the crust 1/4-1/2″ up the sides.
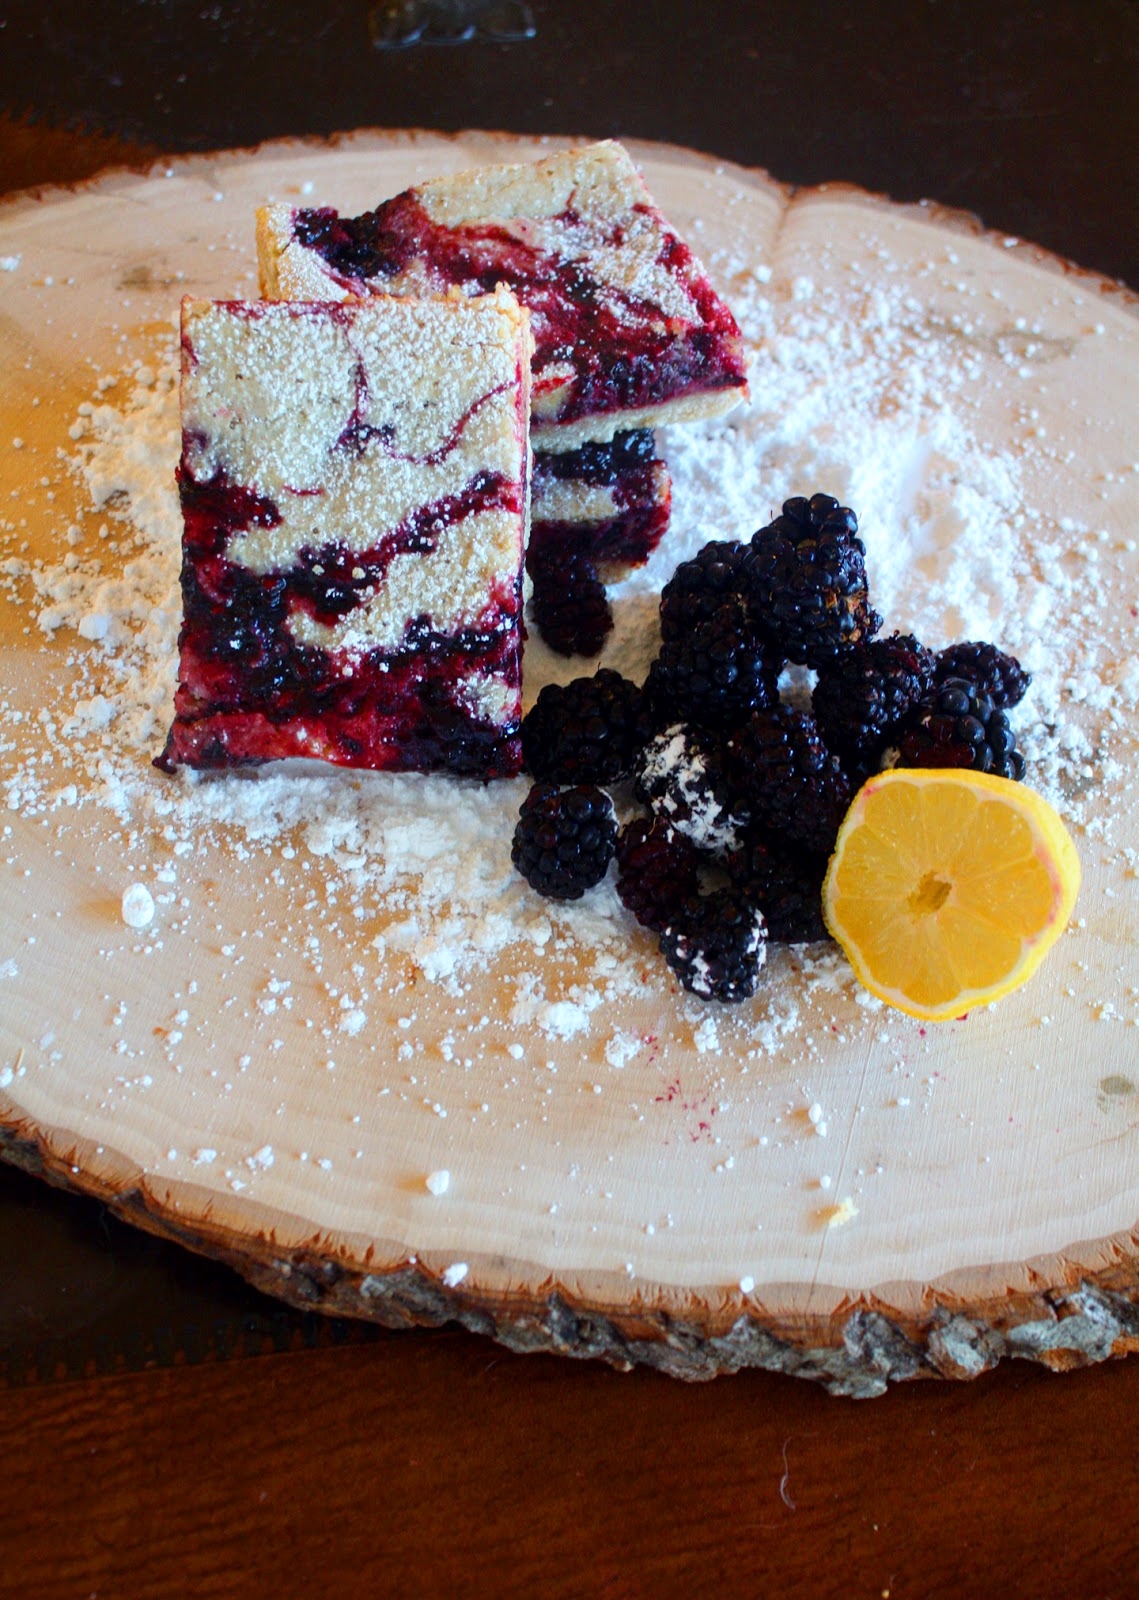
Browned Butter Berry Bars
On August 15, 2013 by sixtyacrebakerThis weekend past, we took a long drive with no real agenda. Except to explore. As we drove north i began to obsess. A cookbook was given to me about a year ago called Big Sur Bakery. While getting lost in its pages, I fell in love with the place, and began imagining each bite. While big sur is coastal, we were on an inland route a little jot west, wasn’t too far off course.
{it wasn’t like we had anywhere to be}
An hour, and ten white knuckles later, we arrived in Big Sur. Unfortunately, the bakery was hosting a wedding; which meant, it was closed. Double dip dang-nabbit ugh. Instead, we stopped at a half bad restaurant for nourishment not enjoyment planning our return. When we got home, I promptly made these. These are a variation of the brown butter rhubarb bars from The Big Sur Bakery Cookbook using berries we picked that morning.
Brown Butter Berry Bars
adapted from the big sur bakery cookbook
jam
2 cups blackberries and mulberries {or berries of your choice}
juice of 1/2 lemon
1 cup sugar
place all ingredients in a heavy bottomed saucepan. cook on low heat until it begins to bubble and thicken. watch closely and cook until it is thick and jammy. set aside to cool
crust
1 cup unsalted butter–melted
1/2 cup powdered sugar
1/2 tsp kosher salt
1 1/2 cups flour{whole wheat or all-purpose}
whisk together the flour, powdered sugar and salt. stir in butter. press into a 9″x 13″ pan. bake in a 375^ oven until it just begins to brown(15-18 minutes). remove from oven and allow to cool.
brown butter filling
3 large eggs
1 1/4 cup sugar
1/2 tsp salt
grated zest of 1 lemon
juice of 1/2 lemon
1/2 cup + 2 Tbs unsalted butter
3/4 cup + 2 Tbs flour {whole wheat or all purpose}
1 teaspoon vanilla
place the butter in a saucepan and cook on low heat until it becomes brown and nutty, careful not to burn. whisk together the eggs, sugar, salt, lemon zest, lemon juice, flour and vanilla. carefully stir in the browned butter.
to assemble
spread about half of the browned butter mixture on the prepared crust. dollop about 3/4 of the jam on top. spread the remaining browned butter filling and then dollop the remaining jam. bake for about 25 to 30 minutes, until the edges just begin to turn brown. do not overbake, (allowing the filling to souffle). allow to cool before cutting into bars.
delicious room temperature or directly from refrigerator.
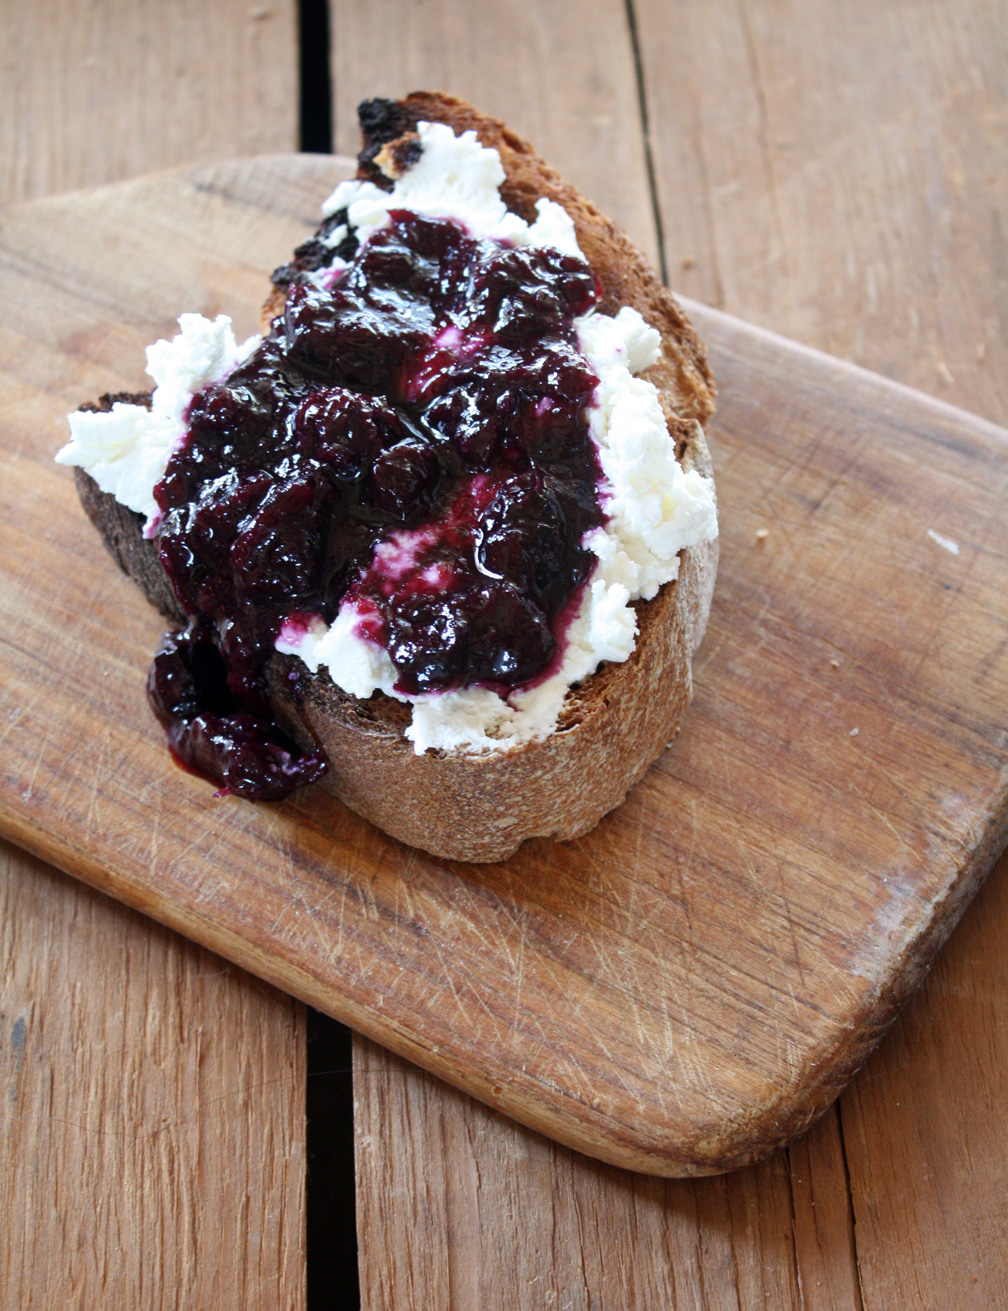
Blueberry-Rhubarb Margarita Jam
On June 16, 2013 by sixtyacrebakerWeekly, I drive past a blueberry farm. Most days, wishing for the season. Some days, mourning the end of summer. The day the open sign pops up, on our little stretch of highway, I stop in. I continue this routine, each week, until blueberries are no more. I hoard more berries than our small family can eat, out of hand. But not more than we can eat, prepared. I love to pair sweet blueberries with rhubarb from our garden for this delicious not too sweet jam.
Blueberry Rhubarb Margarita Jam
3 pints blueberries
8 oz rhubarb–chopped
2 cups granulated sugar
juice of 10 key limes
1/2 tsp kosher salt
1/4 tsp ginger
juice of 1/2 grapefruit (plus/minus)
1 oz tequila (can add up to 2 oz)
Dump blueberries rhubarb, sugar, key lime juice, salt and ginger into your jam pot. Cook on med-low heat, stirring occasionally, until you have a nice jam consistency (about 25-30 minutes). Taste for sweetness. Add at least 1/4 grapefruit juice to both adjust sweetness and for flavor. Cook for 5 more minutes and check again for sweetness. add more grapefruit if desired. pour in tequila and cook at least 5 minutes more. Test jam for firmness on a frozen plate. **i like my jam to be a bit runny. You do not need pectin for this jam to firm up. You can cook it to come out firmer, but be careful not to caramelize it. Place in sterilized jars and refrigerate or if you are a seasoned canner, process for longer storage.
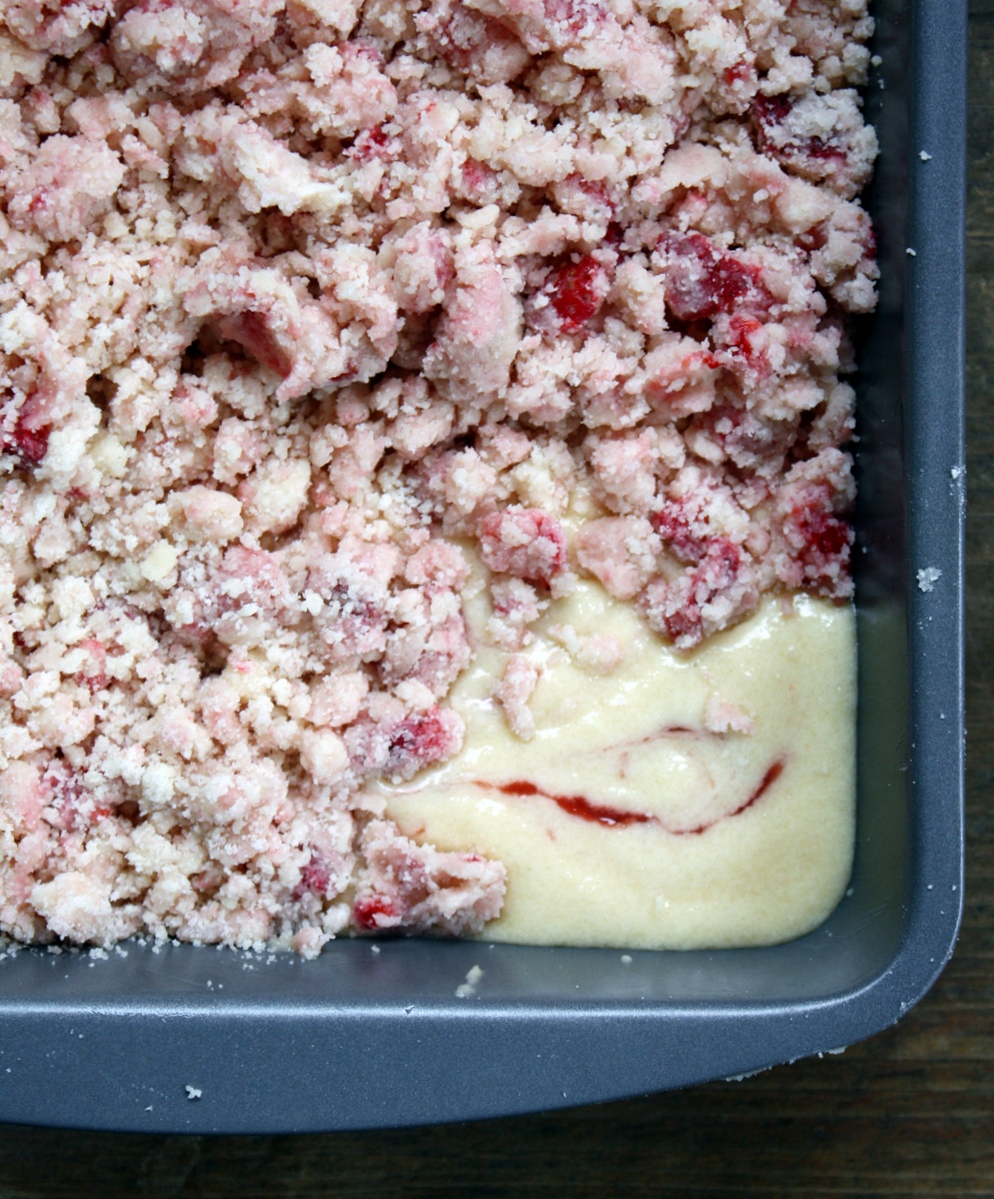
Strawberry Crumb Cake
On May 29, 2013 by sixtyacrebakerStrawberries are ripe, ripe, ripe in my neck of the woods. Every farm stand along my tuesday evening route, touts the sweetest and freshest, organic berries. I can’t resist. Particularly because i make a really great strawberry-rhubarb jam, that disappears faster than anything else in the pantry. I grab loads of the juicy red fruit whenever i find it. Being as we spend most days at the ranch counting idle minutes on one hand, it feels less guilty to indulge in a bit of sweet at day’s close. When i have a moment, I bake a cake like this one. It is a simple twist on a classic crumb cake, using the sweet ripe fruit of the season in its crumb.
Strawberry Crumb Cake
cake
1 1/4 cup cake flour (sifted, then measured)
1/2 cup granulated sugar
1/4 tsp baking soda
1/4 tsp kosher salt
3/4 cup unsalted butter (room temperature–cut into cubes)
1 large egg
1 large egg yolk
1 tsp vanilla
1/3 cup buttermilk
4 tsp of your favorite strawberry (or strawberry-rhubarb) jam
Place the flour, sugar, baking soda and salt in a stand mixer fitted with paddle attachment. Quickly give it a few turns to incorporate everything together. Add the butter. *the butter should be softened, but not warm and creamy. You want it to mix into the flour mixture making more of a clumpy sand consistency, then a creamed. Mix the ingredients until the butter is finely incorporated into the flour mixture. Meanwhile, combine the buttermilk and vanilla. Add the whole egg and the egg yolk to the flour mixture and mix until incorporated. Use a spatula to scrape down the sides and bottom of bowl to ensure there are no dry spots. With the mixer on low speed, add the buttermilk/vanilla mixture and mix until just incorporated. Do not over mix pour into a 8×8 buttered square cake pan. Strategically plop the 4 tsp of jam you can add a bit more if you like in the batter. Run the back of a butter knife through the cake batter to swirl the jam through evenly. Set aside while you prepare the crumble.
crumble
3/4 cup granulated sugar
1/2 tsp kosher salt
2 cups all purpose flour
10 Tbs unsalted butter–fairly cold–cut into 1/2″ pieces
1 cup fresh ripe strawberries–cut into 1/4″ dice
Mix together the sugar, salt and flour by hand in a large bowl. Drop in butter and either work in by hand, or use pastry knives/fork/blender to make fairly large crumble. Tip in the strawberries and work in by hand, using a bit of a firm hand, to get them mixed up well in the flour mixture. Don’t squeeze and knead, you do not want to warm the butter, but allow the strawberries to fully incorporate into the crumb. Gently pile on top of the cake. Some of the crumbs will sink into the cake as it bakes, which is why i make SO MUCH CRUMB!
Bake in a 375F oven for about 35-45 minutes. Check after 30 minutes and keep an eye on it. The cake is moist, so it can tolerate a bit of over baking, but don’t forget to keep an eye on it. Check by using a toothpick or wooden skewer to see if it is done baking. Allow to cool completely before eating
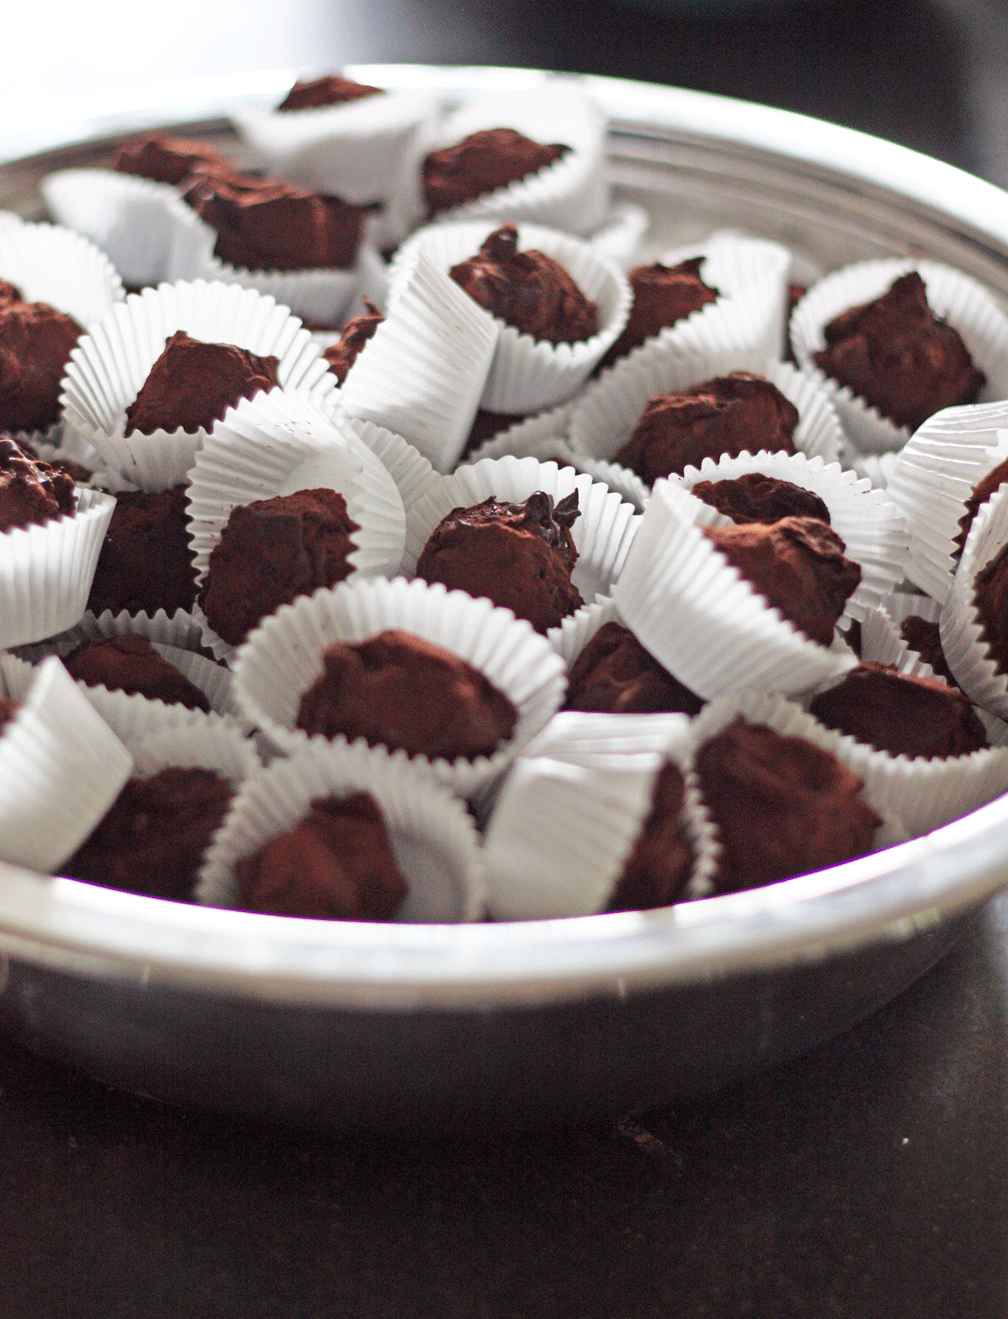
The French Truffle
On March 16, 2013 by sixtyacrebakerI do love the simplicity of a unfussed truffle. No gild or frill. Just quality chocolate, a bit of cream, a splash of cognac, a wisp of sea salt, and butter dipped and dusted.
The French Truffle
9 oz bittersweet chocolate (min 65%)
6 oz heavy cream
pinch sea salt
1 Tbs unsalted butter
2 Tbs cognac
*chocolate for coating and cocoa powder (or powdered sugar) for dusting
Bring heavy cream and sea salt to a simmer over low heat. Place chocolate bits in a large bowl. Cut the butter into small pieces and place in bowl with chocolate. Remove cream from heat and swirl in cognac until incorporated. pour over the chocolate bits and allow to sit 1 minute before stirring. Stir until the chocolate and butter is melted and fully incorporated into the cream. The mixture should be thick. Allow to sit at room temperature until it hardens enough to form into balls. Using a small ice cream scoop, or melon baller, form filling into balls. Roll them between your palms until they are perfectly round. Allow to sit out (or place in the refrigerator) until they harden up again. if you put in the fridge, allow to come to room temperature. At this point, you may roll them directly into the cocoa powder or powdered sugar. I like to enrobe mine in chocolate. It gives them the rough exterior as well as helps preserve the delicate filling.
To enrobe:
It is not required to use tempered chocolate for this particular truffle because you will be rolling it immediately in cocoa powder. It is however, important that you do not heat your chocolate to too high a temperature otherwise it will not harden back up properly. Using a microwave safe bowl, cook about 8 oz of chocolate pieces 30 seconds at a time in the microwave. After the first 30 seconds, check the heat of the bowl. if it is really hot, you can melt the chocolate in its residual heat. Remove the bowl from the microwave and stir the chocolate. If it melts completely, then you are done. If it doesn’t melt at all…cook for another 30 seconds…if it is almost melted, go down to 10 second increments and watch to make sure that it doesn’t get too hot. When you are ready, place a shallow bowl of cocoa powder next to your bowl of melted chocolate. Dip each truffle in the melted chocolate, then immediately drop into the cocoa powder. Coat it completely, then remove to a lined baking sheet to cool. I do not recommend putting the truffles in the refrigerator before or after dipping (to harden) because it can cause the filling to expand and contract, and break through the coating. They should do fine at room temperature to firm up. I do however, recommend refrigeration for longer term storage.
You can also freeze the filling (once you have them formed into balls) well sealed for up to a month. Remove them and allow them to defrost in the refrigerator, then come to room temperature before dipping, being careful to remove any condensation.
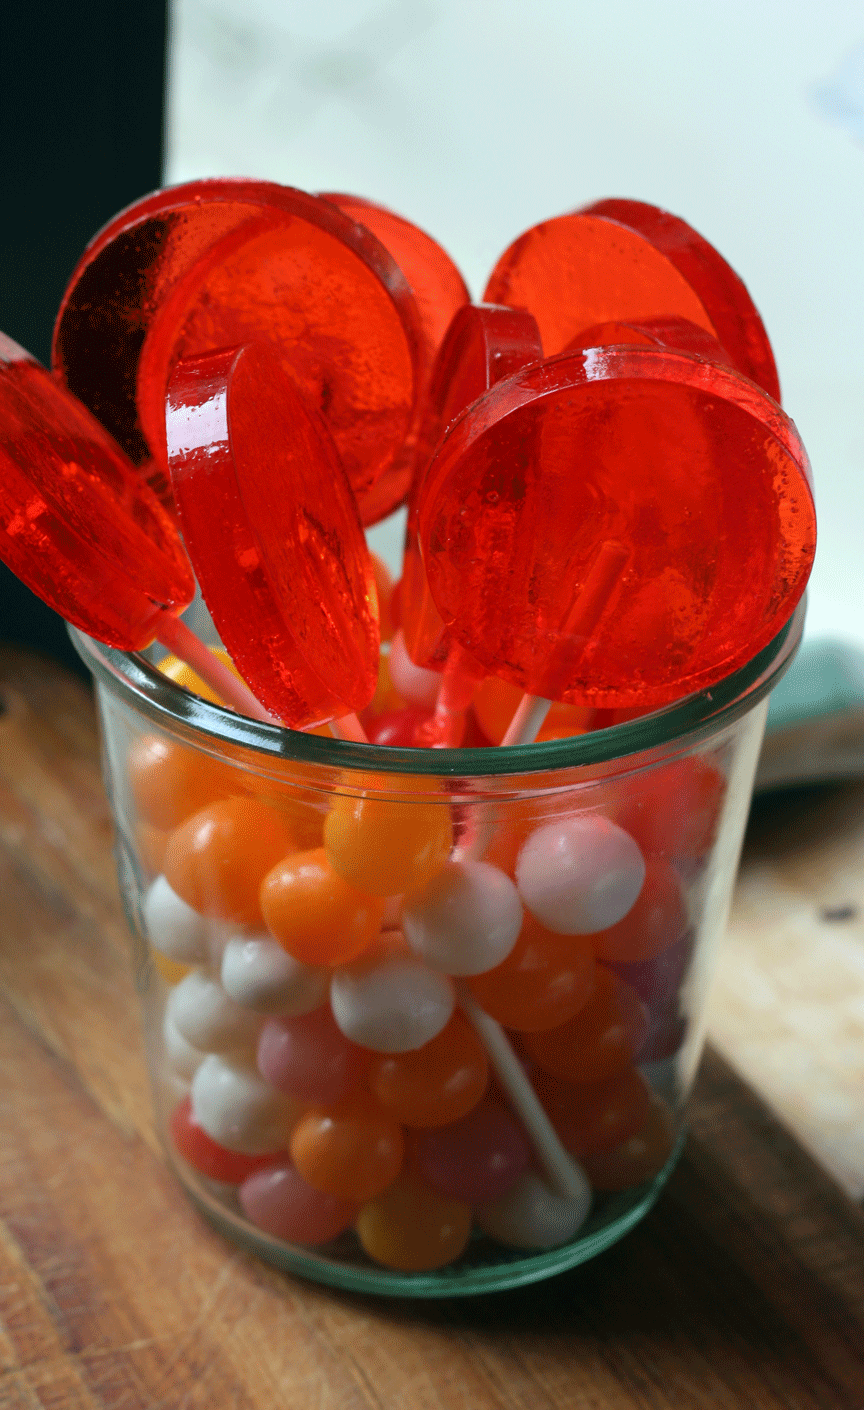
Lollipops
On March 8, 2013 by sixtyacrebakerThese are rather simple. Of most importance is that you thermometer is accurate and humidity levels are at a minimum.
Lollipops
2 cups sugar
2/3 cup corn syrup
1/2 tsp cream of tartar
1/4 cup water
2 tsp flavor (if using extract–much less if using oils)
food color
Place sugar, corn syrup, cream of tartar and water in a heavy bottomed pot. Stir to combine, and wash down sides with a pastry brush dipped in a bit of water. Place on very low heat and stir until the sugar has melted and the liquid begins looks clear. Cease stirring and insert candy thermometer. Allow to boil, untouched until the syrup reaches 290F. Don’t loose patience, keep the fire on very low. At 290F, begin to watch very carefully. I like to allow the temp to come all the way to 310F, but if you are making a light colored pop, you may want to stop at 300F, as the sugar begins to develop a color around 295F. When you reach your desired temperature, add the food color and flavoring, and swirl to incorporate. Keep the pot on the fire and allow it to come back up to temperature (300F or 310F respectively). Carefully pour into your molds, or onto a greased sheet of foil. Add sticks and then allow to cool at room temperature.
makes about 18-20 2″ pops
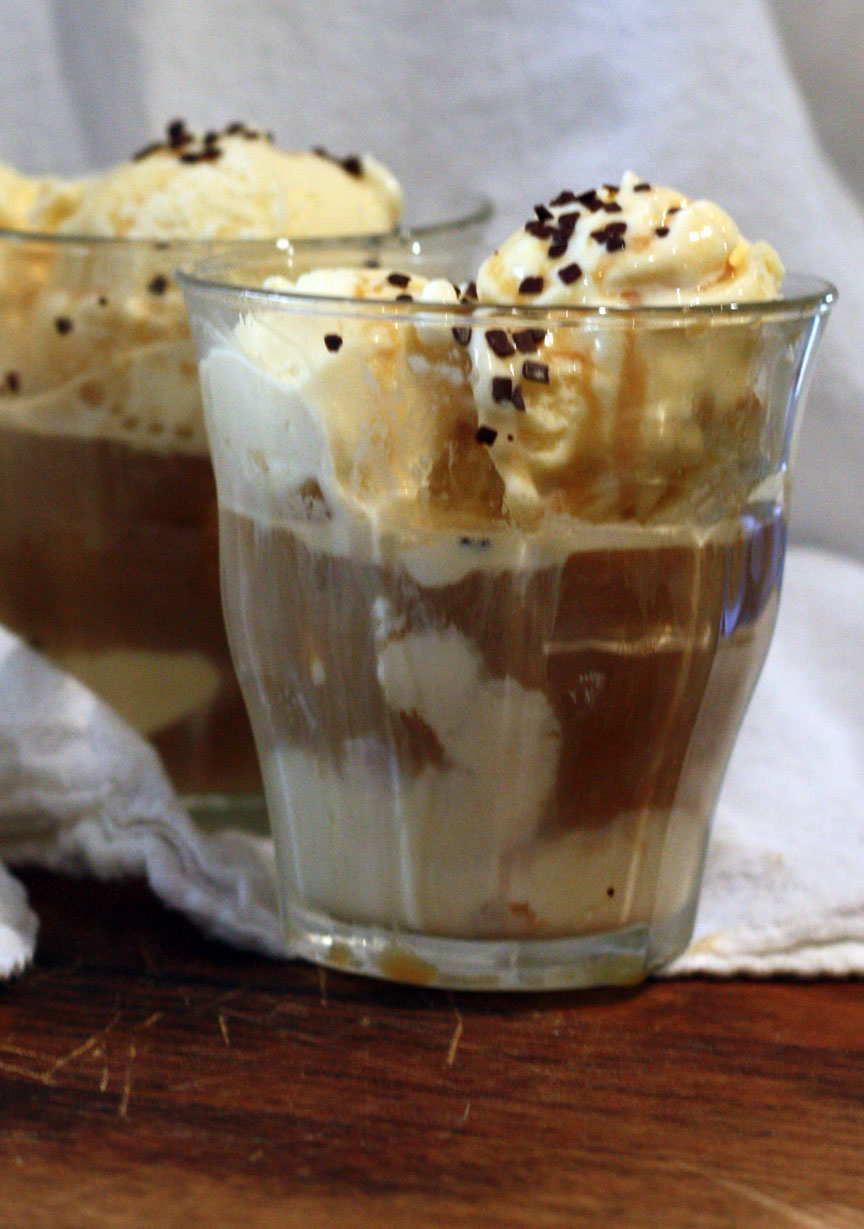
Affogato
On February 28, 2013 by sixtyacrebakerSometimes afternoons call for a snack; a pick me up that is both frozen and warm, and punched with caffeine. When the mood strikes, fix yourself one of these.
Affogato
vanilla ice cream
shot of espresso
This is not a sundae…nor it is meant to be a huge dessert. use a nice vanilla ice cream and give yourself a nice size scoop. While your shot of espresso is still warm (but not piping hot), pour over the ice cream. The espresso will melt the ice cream, so don’t linger too long….