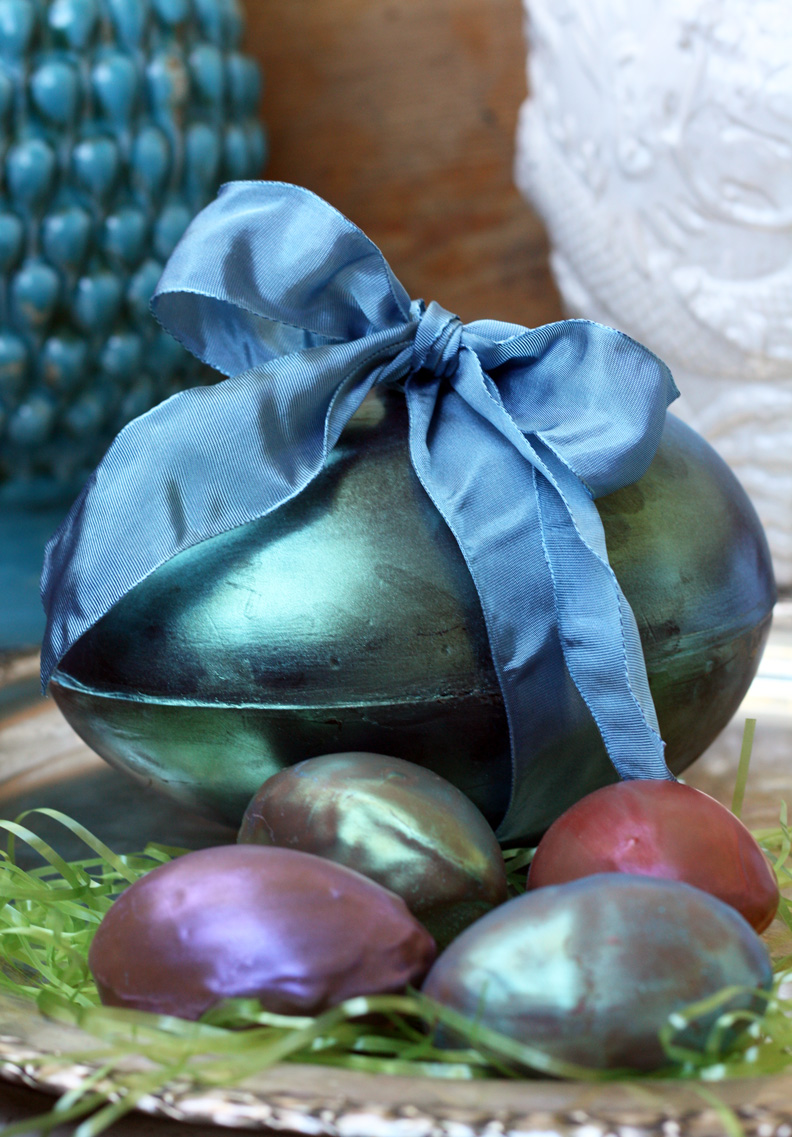
Chocolate Easter Eggs with a Surprise
On March 30, 2012 by sixtyacrebakerI have always loved those giant chocolate eggs from Italy. This time of year they line the shelves of my local Italian market. Large and hollow, a handful of small candies tossed in the cavernous hole, and wrapped in bright mylar paper. Easter basket ready. The real joy is breaking through the chocolate shell to see what goodies lay within. This year, i am giving the Easter Bunny a helping hand. Extra special chocolate filled with toys and jewels; hand chosen for each recipient.
Imagine the joy and surprise when these beautiful eggs are cracked open.
trinkets
toys
and
jewels
tumbling out
A happy easter indeed.
If you want more details on how to make these leave a comment or drop me a line at sixtyacrebaker(at)gmail(dot)com

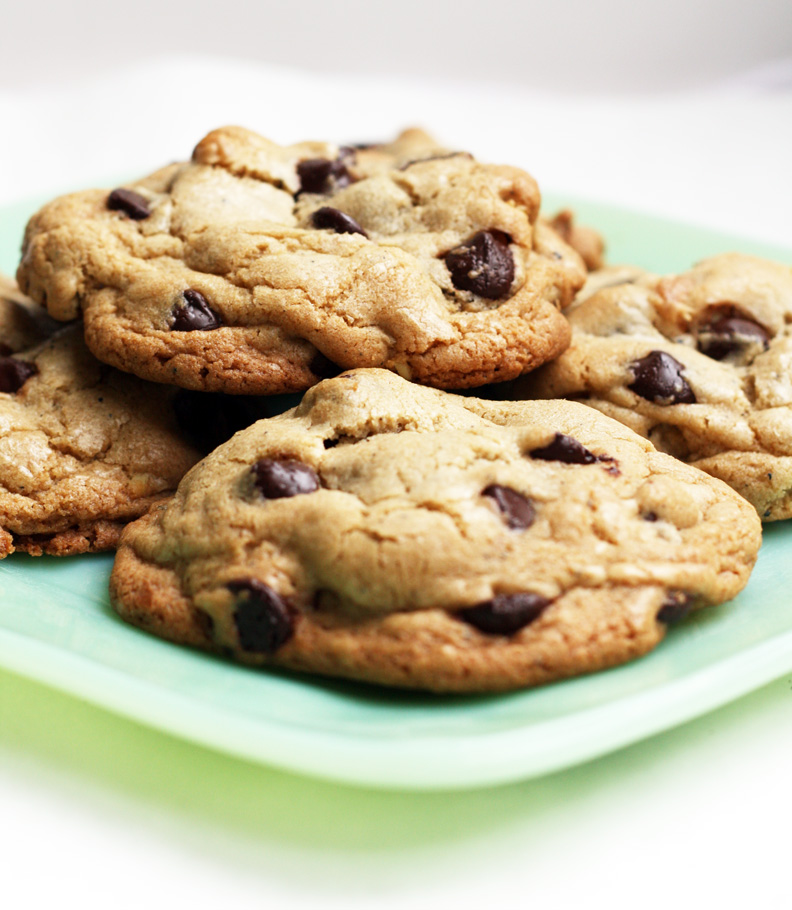
Browned Butter Chocolate Chip Cookies
On January 30, 2012 by sixtyacrebakerMayberry-esque after school tales of warm cookies and cold milk, aren’t mine. In my world cookies were for Christmas; fruit, yogurt, and cheese were snacks. I never quite developed a sensory memory for the ubiquitous toll house. Instead of invoking memories of backyard tag, championship games, and mom with flour dusted apron, I’ve been a bit bored by them. >em>Until Now. This is not my recipe. It came to me by way of a third-party. I have been told it was created by Cook’s Illustrated. It doesn’t surprise me in the least bit. This cookie is filled with notes of toffee, enough salt to tease your palate, the bite of bitter chocolate and manages to be both soft and crispy. The recipe is a bit fussy, but worth it. trust me….
Browned Butter Chocolate Chip Cookies
makes 16
from cook’s illustrated and only v.slightly changed
1 3/4 cups all purpose flour
1/2 tsp baking soda
14 Tbs unsalted butter–divided
1/2 cup granulated sugar
3/4 cup dark brown sugar-firmly packed
1 tsp kosher salt
2 tsp vanilla extract
1 large egg
1 large egg yolk
1 1/4 cup bittersweet chocolate chips
3/4 cups toasted walnut halves
Heat oven to 375F. Line baking sheets with parchment paper. Whisk flour and baking soda in a bowl and set aside. Heat 10 Tbs of butter in a skillet over medium heat, swirling continually, until it becomes a dark golden brown and it smells a bit toffee like. This should take about 3-5 minutes…the larger the skillet, the quicker the reaction. Remove from heat and pour butter into mixing bowl. Add the remaining butter and stir until it is melted. Add the sugars, salt and vanilla to the bowl and hand-whisk until mixed well. Add egg and egg yolk and whisk until smooth and begins to lighten in color a bit. Let rest for 3 minutes. whisk again for 30 seconds and let rest for 3 minutes. Do this procedure 2 more times. Use a wooden spoon or spatula to stir in the flour mixture so that it is just combined–do not over-mix. Stir in chocolate and nuts. Scoop out large balls (about 3 Tbs) onto to the parchment, placing about 2″ apart. Bake for about 10-14 minutes or until the edges are slightly browned. Cool on wire rack.
*the original recipe calls for table salt, semi -sweet chips or chunks and chopped pecans or walnuts. i prefer kosher salt, bittersweet (60-70% cocoa solids) and large pieces of walnut which is why i inserted them into the recipe. try it both ways and decide for yourself!
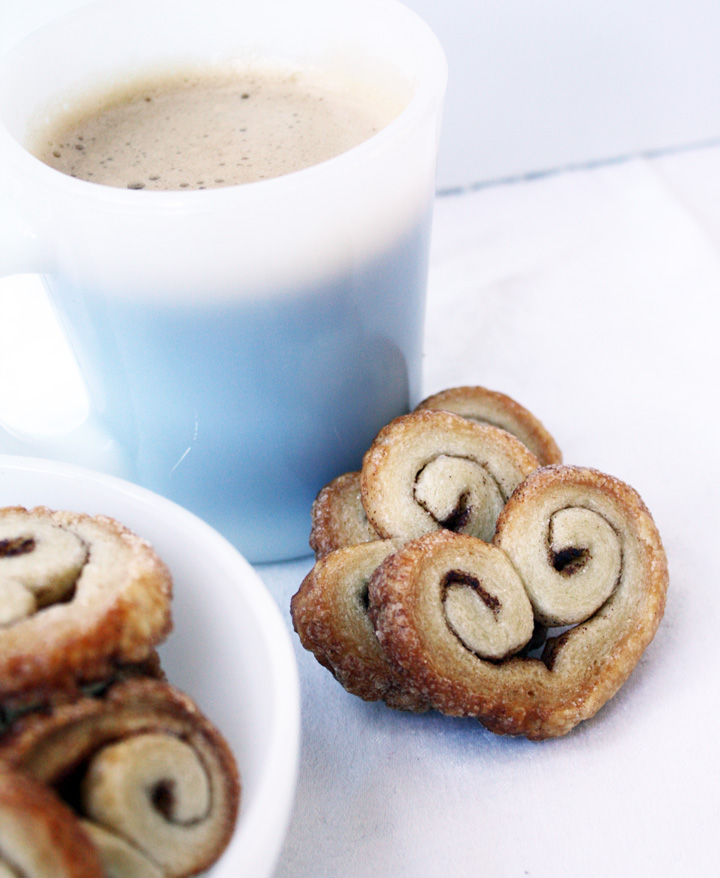
Heart Palmiers
On January 11, 2012 by sixtyacrebakerWe have neighbors with fabulous taste. Crown molding, silver service, art gallery lighting kind of taste. I almost wonder if Mike and I are their pro-bono friends. While residing in California, we rang in London’s new year together. Complete with champagne, caviar, and crown roast. Imagine my horror, as I catch from the corner of my eye, Mike, in all his glory with hands full of palmiers. With flaky crumbs falling to his beard and a smile as broad as his shoulders he was complimenting the hostess on her fabulous dessert. Turning to me, he gave a grand wink and said “you should make these”. So I did.
Simple Easy Heart Palmiers
1 sheet puff pastry–cold but not frozen
2 Tbs unsalted butter–melted
2 Tbs granulated sugar
1 1/2 tsp cinnamon
1/4 cup granulated sugar for dipping
Place puff pastry on a sheet of parchment. In a small bowl, mix together the 2 Tbs granulated sugar and 1 1/2 tsp cinnamon. Using a pastry brush, brush the butter evenly covering the entire piece of pastry. Evenly and liberally sprinkle the cinnamon sugar on top of the butter. Measure or eye the center of the puff pastry and gently score with the dull end of a knife (do not cut through). Starting on one end, tightly roll the dough to the center. Roll the opposite end to the center, forming what looks like a scroll. Gently press together, and if you would like an exaggerated heart shape, pinch the bottom to a point. Wrap in parchment and/or plastic wrap and place in the refrigerator to chill. After 1 hour and up to 24 hours, preheat the oven to 375F. Line a cookie sheet with parchment paper. Place the remaining 1/4 cup sugar in a saucer or shallow bowl. Remove the dough from the refrigerator and slice crosswise in 1/4″ sections. Reshape as necessary, then dip both sides in the sugar. Place on parchment paper approximately 1″ apart. bake for 12-15 minutes or until golden brown and crispy. Allow to cool a bit, but not fully before removing from the parchment. The sugar will cause them to stick if they cool too much. Allow to finish cooling on a wire rack.
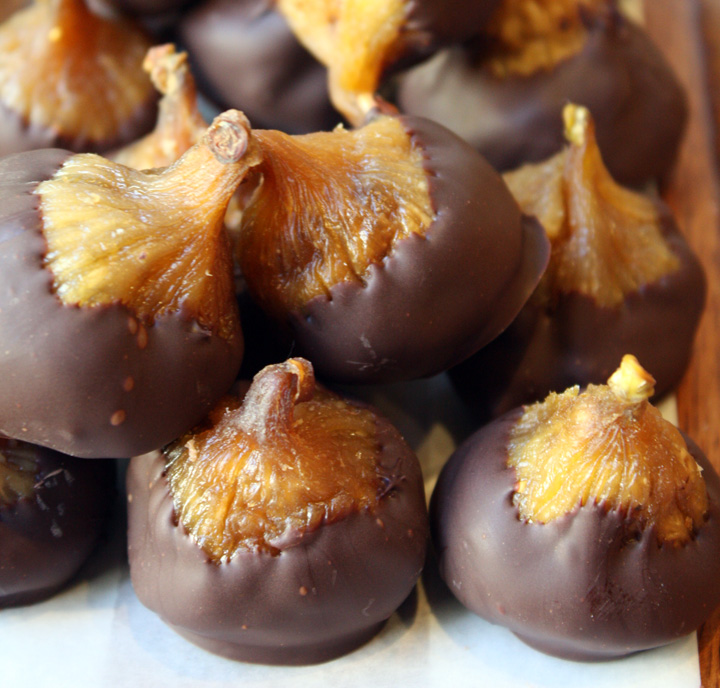
Chocolate Dipped & Walnut Stuffed Figs
On December 29, 2011 by sixtyacrebakerWe really didn’t eat a lot of desserts when I was a kid. After dinner a pot of coffee was brewed and bowls of fresh fruit and nuts were heaved to the table. One particular treat, at holiday time, was freshly cracked walnuts stuffed into dried figs. This year I gave the treat a little update, by dipping the figs in bittersweet chocolate. A sweet with benefits.
Walnut Stuffed Figs
12 dried figs
12 large walnut halves-toasted
bittersweet chocolate-melted and tempered
Using a sharp knife, make a split in the fig without cutting all the way through
Stuff a walnut into the fig and close it completely. Dip in chocolate and allow the chocolate to harden at room temperature. You can store these at room temperature or the refrigerator.
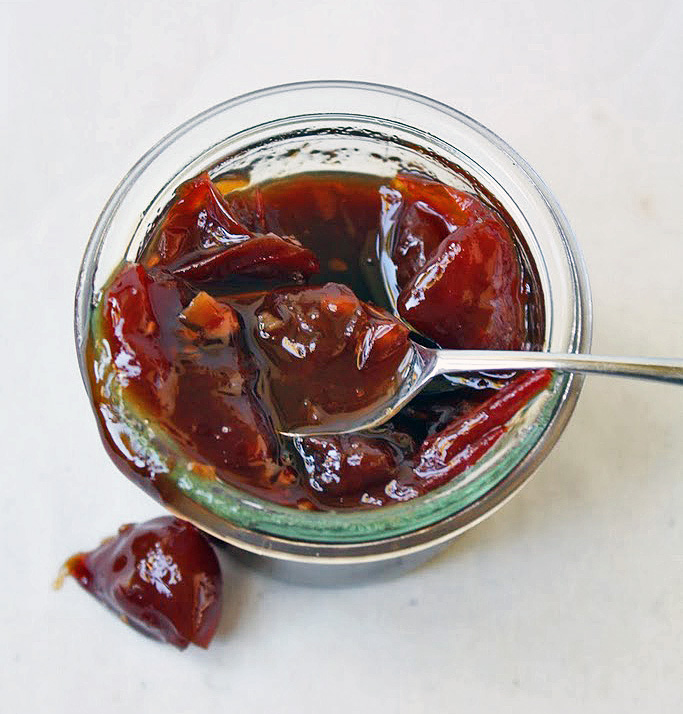
Tomato Chutney
On December 10, 2011 by sixtyacrebakerBasically, I am obsessed with this stuff. It is a recipeI I swiped from my visit to Ca’ di Gosta, in the hills of Umbria. It was served one afternoon and after catching me licking the jar clean, Jenny shared the recipe with me. Great on a turkey sandwich or a perfect condiment to roast pork. Make it. make. it. now.
Tomato Chutney
makes approx 6 pints
3 lbs cherry tomatoes-cut in half
1 head garlic-peeled and finely chopped
1 heaping tsp crushed red pepper
about 2″ root ginger–peeled and finely chopped
10 oz cider vinegar
1 1/2-2 lbs dark brown sugar
generous pinch of kosher salt
Place all ingredients in a large pot. Stir and allow to sit for 30-60 minutes. Place over medium heat, stirring occasionally and allow it to get to a dark, jammy like consistency. This should take the better part of an hour. When you think the chutney may be ready, taste for flavor. You can adjust the sweet/sour/spicy at this point by adding more sugar, vinegar or red pepper. Test for doneness by placing a small bit of the chutney on a cold plate. If the chutney allows you to run a finger through it leaving a clean break, it is ready. You do not want it to get hard like a candy. Place in glass jars and store in the refrigerator or if you are familiar with proper canning procedures, process for 15 minutes (at sea level) in sterilized jars.
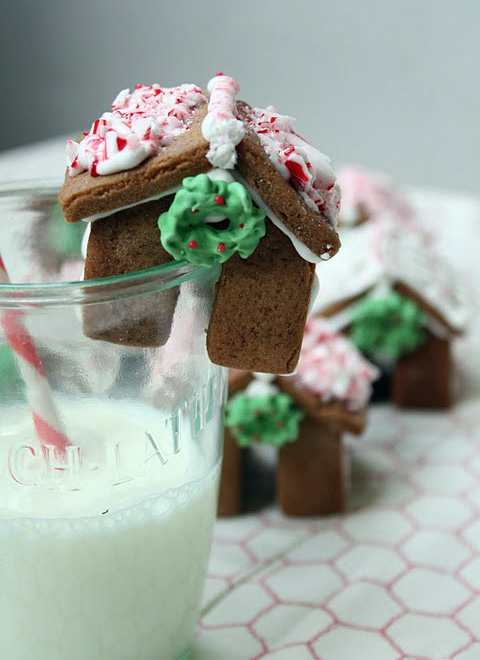
Gingerbread Side Cars
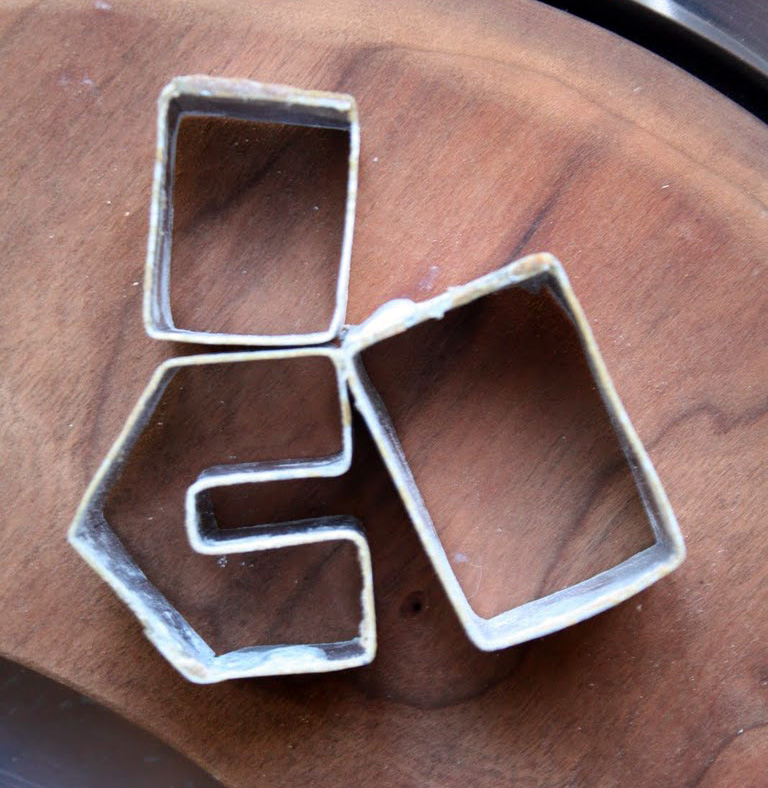
On December 6, 2011 by sixtyacrebakerI have made gingerbread villages, chateaus, and houses for as long as I can remember. Last year I spotted little gingerbread houses perched on a mug at a blog called Not Martha. as far as I can tell–this is her original idea. Giddy and obsessed, as i have been known to get, I went to Mike to beg for help. He agreed to make cookie cutters so i wouldn’t have to knife cut each piece. Blowtorch in one hand, pliers in the other, he made these.
I in turn, made these adorable side cars, for a hot mug of cocoa or glass of milk.
Use your favorite gingerbread cookie recipe and bake as directed. Cool, assemble and decorate. Tip: I plane the sides with a microplane to ensure straight edges. These attach quite easily with royal icing make it nice and stiff. The wreaths are also made from royal icing colored green and piped with a no.63 tip onto parchment paper. I used sprinkles for berries. Allow to dry overnight–remove carefully–attach with royal icing.
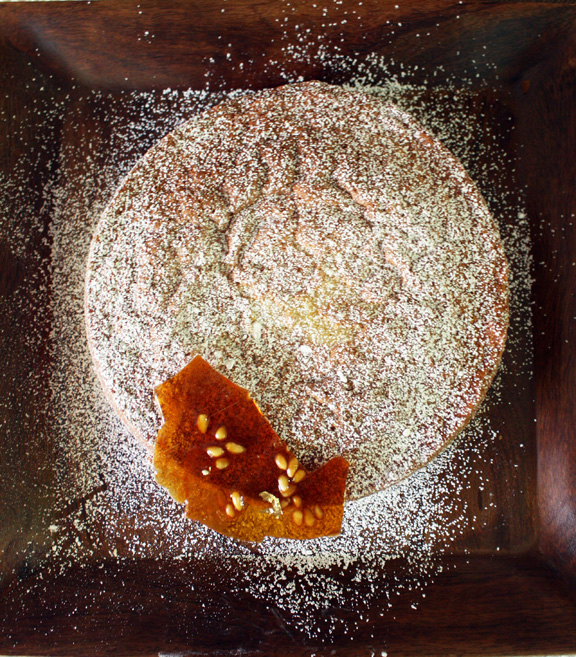
Almond Cake
On November 20, 2011 by sixtyacrebakerI owe David Lebovitz a debt of gratitude. While searching for an almond cake recipe, not calling for almond flour, I came across his recipe. He readily admits this comes from Chez Panisse. My pantry held marzipan rather than almond paste, so I changed the recipe ever so slightly. This cake looks light and airy and it is. But it is also incredibly moist and almondy. Have a slice on its own or pair it with brandied cherries, peach ice cream or toffee. This cake would be a gorgeous addition to your Thanksgiving dessert display.
Almond Cake
v.slightly adapted from david lebovitz
1 cup + 2 Tbs granulated sugar
7 oz marzipan paste (i used odense)
1 cup all purpose flour–divided
1 cup unsalted butter–room temperature
1 1/2 tsp baking powder
3/4 tsp kosher salt
1 tsp vanilla extract
1 1/4 tsp pure almond extract
6 large eggs
Preheat oven to 325^F. Butter and flour a 9″ springform pan. Line the bottom of the pan with a round of parchment paper. Using a food processor with the metal blade, process the marzipan, sugar and 1/4 cup flour until it resembles fine sand. In a separate bowl, mix together the remaining flour, salt and baking powder. To the almond mixture, add the butter, vanilla extract and almond extract and pulse until a smooth batter forms. Add the eggs one by one, and scraping the bowl as necessary in between additions. Add half of the flour mixture and pulse until just combined. Add the remaining flour and pulse a few times. If need be, hand stir the flour until it is fully incorporated. Pour into prepared pan and bake for about an hour. Begin checking after 50 minutes. You can use the toothpick test to check for doneness, or whichever method you prefer. Once removed from oven and while the cake is still hot, run a sharp knife around the perimeter to loosen the cake. Do not open the springform pan until the cake is completely cooled. Allow the cake to cool in the pan. Serve with a dusting of powdered sugar
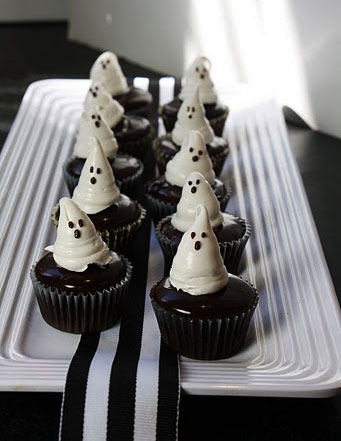
Cake with Ice Cream Ghosts
On October 30, 2011 by sixtyacrebakerThese mini cupcakes are a lot of fun to eat, but if you are a perfectionist and don’t like it when things don’t go your way, don’t do the ice cream part. Use frosting. Make your favorite cupcake recipe and bake in mini-tartlet pan using paper liners. let cool. Dip each in bittersweet chocolate ganache and let firm up. Top with ghost–and serve.
The ghosts are made from homemade Philadelphia Style ice cream. Freeze the ice cream until it is quite thick and could hold shape. Quickly put it into a pastry bag fitted with a tip with a 1/4″ round hole. Pipe the ice cream onto a sheet pan, lined with parchment and immediately put it in the freezer for 4 hours. Remove the ghosts and pipe the chocolate eyes and mouth and return to the freezer. Let freeze overnight. Just before serving, use an offset spatula to move the ice cream from the sheet pan to the mini-cupcakes.
Take your bow, then eat.
If you choose to use frosting rather than ice cream….you can either pipe the ghosts directly on to the cupcake, or you can pipe them on to a sheet-pan, put them in the fridge for an hour or so, decorate with chocolate ganache, and then transfer by offset spatula to the cupcakes
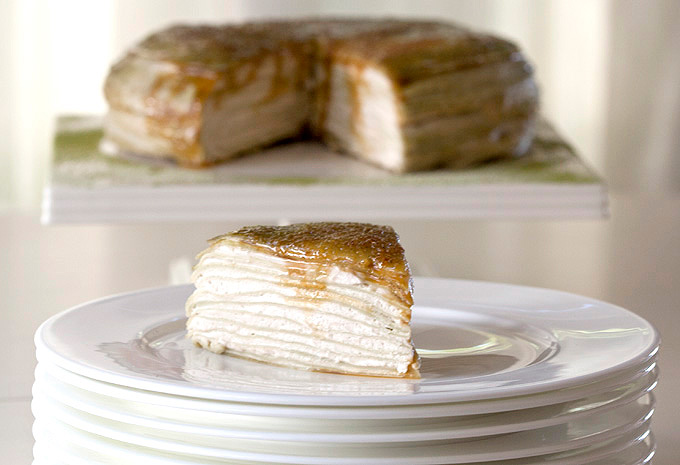
Crepe Brulee
On October 2, 2011 by sixtyacrebakerPasadena is not all about rose queens and debutantes, or penny loafers and posh hotels. Along the edges, nearing the fringe Bijouxs and the Baker (that’s me); inspired by art & culture, the storied past of Pasadena, more underground than paseo more after hours than high tea, more pop art than prep school, created an unexpected gem. A confection well loved in the tea salons of Paris, transforms to lust worthy in the Altier of Bijouxs.
Bijouxs and The Baker met at camp and instantly bonded over immaculately curated bunk rooms think pendleton blankets, leather steamer trunks and vintage oil lamps and an aversion to mingling. It was no surprise to learn they both hail from Pasadena. It was an instant friendship bonding while breaking bread. Not clear who said it first, but both agree; Pasadena can be sexy and hip and well ahead of the curve. It just doesn’t want everyone to know. Now the secret is out.
Lynn and i have collaborated on an amazing dessert: preppy handbook meets laduree.
Lynn gray of Bijouxs is an artist in the kitchen. She brings a designer’s palate to food. When the light casts like chiffon in my kitchen, I close my eyes and wander my mind to the Bijouxs studio to watch my simple dessert of crepes and custard become art.
Crepe Brulee
Makes 1-9-inch cake
Green Tea Crepes
3 cups milk
1 tablespoon matcha (green tea powder)
4 1/2 tablespoons unsalted butter, melted
7 1/2 tablespoons sugar
1/2 teaspoon kosher salt
6 eggs
2 cups flour
Place all ingredients in a blender and blend very well. Place in the refrigerator for at least 2 hours and up to overnight. Heat a 9-inch non-stick crepe pan over medium heat. Hold the crepe pan in one hand, while using a measuring cup or ladle to spoon a bit of batter with your other hand into the middle of the pan. Gently swirl the pan, moving the batter to make a thin pancake the same size as the base of your pan. Place back on heat and allow it to cook, but not brown. The top of the crepe will become dry. Turn and quickly cook the second side. Turn out onto a platter and proceed with the remaining batter. This recipe makes about a dozen crepes.
Raspberry custard
2 1/2 cups buttermilk
6 ounces fresh raspberries
1/2 cup plus 2 tablespoons sugar
6 egg yolks
1/4 cup cornstarch
3 ounces butter
Pinch kosher salt
1 tablespoon Chambord liquer (optional)
Whirl the raspberries, buttermilk and sugar in a blender until the raspberries are fully pureed. Pour through a strainer into a heavy saucepan. In a bowl whisk the egg yolks with cornstarch and salt. Heat the buttermilk mixture over low heat until it simmers. Remove from heat and slowly pour over the egg mixture while whisking the eggs. Return the mixture back to the saucepan, turn heat to medium and continually stir until thickened. Allow the custard to become a bit thicker than you would for a soft pudding. Place the butter and Chambord (if using) in a clean bowl. Run the custard through a sieve (to remove any lumps) into the bowl. Stir to melt and incorporate butter and Chambord. Continue to stir until the temperature drops a bit. Place a piece of plastic wrap directly on top of the custard and place in the refrigerator to cool and firm (can be made a day in advance)
For filling
Whip 2 cups cream with 1 tablespoons powdered sugar until peaks form. Mix in 50/50 with the cooled raspberry custard.
To Assemble
12-15 green tea crepes
1 batch raspberry filling
Granulated or demerara sugar
Brulee torch
Place one crepe on your serving platter. Spread a 1/4 inch layer of filling over the crepe using care not to go fully to the edge. Place a crepe on top. Continue layering until you have used all crepes and filling. The cake should be 10-15 crepes high. Cover and place in the refrigerator and allow to firm up. This can be done a day in advance.
Before you are ready to serve, remove from the refrigerator. Sprinkle a nice layer of sugar over the top and torch until crisp. Sprinkle a second layer of sugar and torch again. This will give you a nice thick crunch on top. Slice and serve while still chilled.
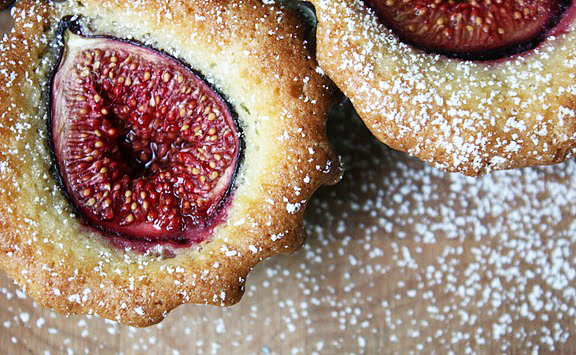
Cornmeal and Fig Financiers
On September 4, 2011 by sixtyacrebakerRecently I met a young man. He asked to meet to discuss an idea. An idea born in sharing. I was early for the meeting, mostly because I have yet to shake some of my uptight corporate mores. He was tardy but only by minutes. A delay caused by
a sweet pause to pick gorgeous ripe figs which he then gifted to me. We talked for hours about our love of good food and how we share it with others.
Cornmeal and Fig Financiers
1 1/2 cups unsalted butter
1 cup sugar
1 Tbs honey
2 Tbs buttermilk
3 large eggs
1 tsp vanilla
1 1/4 cup flour
1/4 cup cornmeal *
3/4 tsp baking powder
1/4 tsp kosher salt
5-6 fresh figs-halved
Measure the flour, cornmeal, baking powder and salt in a bowl. Whisk to combine. In a mixer fitted with the paddle attachment, cream the butter, sugar and honey. Add the eggs one by one, scraping down the sides of the bowl after each addition. Quickly beat in vanilla and buttermilk. On low speed, mix in the dry ingredients, do not over mix. Scoop into small brioche molds, cupcake tins or other vessel. Fill to about the halfway mark (perhaps just a tad bit more), and then gently push 1/2 fig on top. Bake at 350 for approximately 15-30 minutes. Use the toothpick method to ensure they are baked through.
*i used a medium coarse cornmeal–but you can use anything from fine to coarse…the texture of your cake will reflect whichever you choose to use.